Brand Story
A Comprehensive Guide to the KILO Heat Press Machine: Operation and Features
Dec
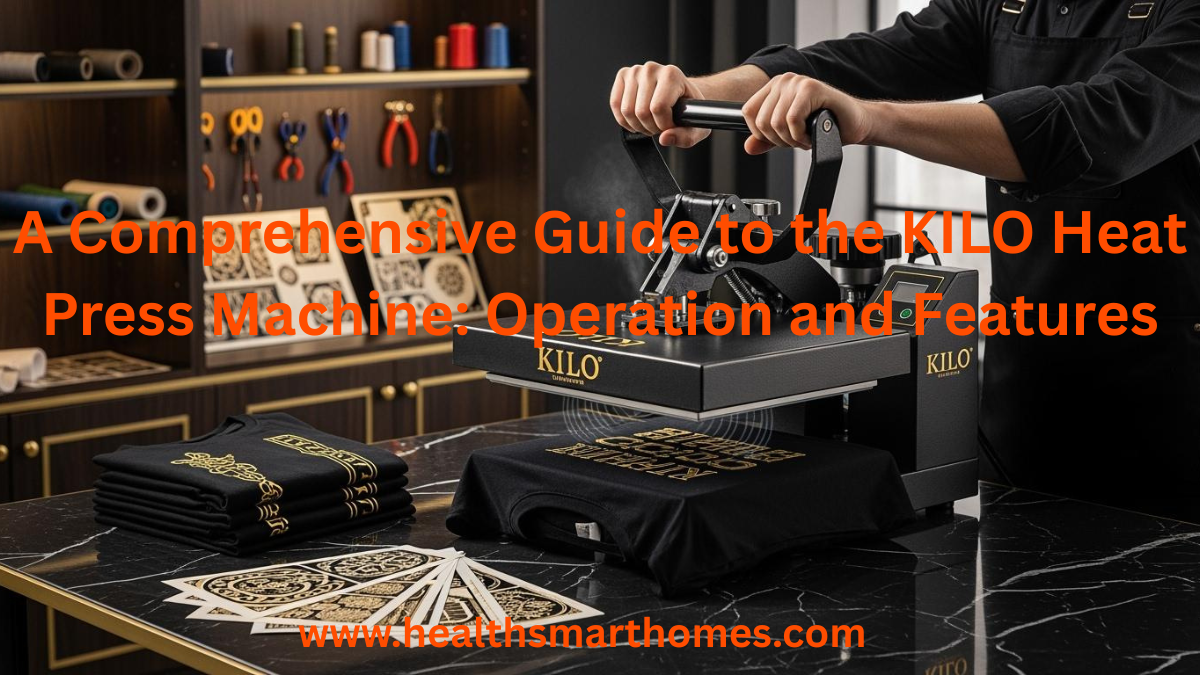
When I use a KILO heat press machine, I see a strong tool. It is made for factories and uses compressed air. The machine presses designs onto many things. This heat press machine works by itself. I just connect it to an air compressor. Then, it presses with the same pressure each time. The machine is special because it works quickly. It also keeps my arms from getting tired. I use it for lots of jobs. I stamp clothing, jeans, and jewelry with it.
| Application Type | Description |
|---|---|
| Clothing Hot Stamping | Used for putting designs on clothes. |
| Jeans Diamond Stamping | Used for stamping decorations on jeans. |
| Jewelry Hot Stamping | Used for adding designs to jewelry. |
I see that the heat stays the same. So, every item looks alike. I trust this machine for big jobs and good results.
KILO Heat Press Machine Overview
What is a KILO Heat Press
When I use a kilo heat press, I see a strong tool. It is made for factories and busy shops. This machine uses air pressure to press designs on many things. I hook it up to an air compressor. The machine does the pressing for me. I do not need to push hard. The kilo heat press is big, so it handles large jobs easily. I use it to print on clothes, jeans, and jewelry. The machine keeps the heat steady, so every item looks the same. I trust it for lots of work because it is fast and never gets tired.
Key Features and Benefits
I see many features that make the kilo heat press special. The machine presses by itself, so I do not have to push down. It has two platens, so I can work on two things at once. Infrared positioning helps me put my designs in the right spot. I can change the heat, time, and pressure with a digital panel. This makes printing simple and correct.
Tip: I always check the digital panel before I start. This helps me not make mistakes and keeps my work easy.
Here is a table that shows some main features and what they do:
| Feature | Benefit |
|---|---|
| Dual Heat Press Capabilities | I keep working and finish more items faster. |
| Advanced Heating System | I get quick and even heat, so my designs look good. |
| Digital LED Control Panel | I set heat, time, and pressure just right, so I make fewer mistakes. |
| Automation | I do less work by hand and get the same results each time. |
| Versatility | I use the machine for many materials, so I can do lots of jobs. |
| Size and Power | I can do bigger jobs and handle more orders. |
| Quality Maintenance | I keep my work good, even when I do many items. |
I think the kilo heat press is great for work. It helps me print a lot and keeps my arms from getting tired. The steady heat and automatic pressing make my job simple. I can change settings for each project, so I have more control. This machine is a smart pick for anyone who wants good results and fast work.
Main Components of the Heat Press Machine
Pneumatic System and Air Compressor
I start with the pneumatic system when I set up my machine. This part uses compressed air to press down hard and evenly. I connect the machine to an air compressor. The right air pressure helps heat spread across the plates. I check how much air the machine uses to make sure it works well. I can change the pneumatic pressure to help the press and lift move smoothly. Here is a table that shows how the air compressor changes how the machine works:
| Specification Aspect | Impact on Performance |
|---|---|
| Air Pressure | Makes sure heat spreads evenly for good pressing. |
| Air Consumption | Needs to match the machine for best results. |
| Regulation of Pneumatic Pressure | Lets me adjust how fast the press and lift move. |
Heating Element and Platens
The heating element is the most important part of my machine. It heats up quickly and keeps the temperature steady. I can set the temperature from 40-205°C (104-401°F). This lets me use many different materials. The platens hold my items in place. My machine has two platens, so I can press two things at once. This helps me finish more jobs faster. Here is how dual platens help me work:
| Feature | Benefit |
|---|---|
| Double the Output | Press two things at once and save time. |
| Boost Your Business | Make more items and take more orders without losing quality. |
| Ideal for Large-Scale Printing | Made for big jobs and busy places. |
Digital Controls and Infrared Positioning
I use the digital LED panel to set the heat, time, and pressure. This makes my work easy and correct. I can change the settings for each job. The panel lets me control the heat from 0-428°F (0-220°C). I also use the infrared positioning system. This tool helps me line up my designs just right. It makes my work more accurate when I cut or print.
- Set the temperature with the digital LED panel
- Change the pressure for different things
- Use infrared to put designs in the right spot
Tip: I always check my settings before I start a big job. This helps me not make mistakes.
Safety and Customization Features
Safety is very important to me. My machine has certifications like CE, ISO 9001, FCC, and RoHS. These show the machine is safe and high quality.
| Certification | Description |
|---|---|
| CE | European Conformity |
| ISO 9001 | International standard for quality |
| FCC | Federal Communications Commission |
| RoHS | Restriction of Hazardous Substances |
I also like that I can change things on my machine. I can pick a big heat press for large jobs or a manual one for custom work. I can switch the lower platen or add a laser tool for better results. These choices help me use the machine the way I need.
How the KILO Heat Press Works
Setup and Preparation
When I set up my heat press machine for the first time, I follow a clear process. I want to make sure my installation is safe and ready for high-volume production. Here are the steps I use:
- I place the heat press machine on a stable, level surface. This keeps it from moving during printing.
- I connect the power cord to a dedicated 20A outlet. This helps the machine run smoothly and avoids electrical problems.
- I check all bolts, screws, and frame parts. I make sure everything is tight and secure.
- I clean the heat plates before I start. Dust or dirt can affect my results.
- I find the air inlet port at the back of the machine. I connect the air compressor using the supplied tubing.
- I adjust the pressure using the regulator knob on the control panel. I always check how to set the pressure for my material.
- I set the temperature and time based on what I am printing.
Tip: I always use a hose locking device when I connect the air tubing. If I forget to press down the locking device before inserting or pulling out the hose, I can damage the machine.
Here is a table of common mistakes I try to avoid during setup:
| Common Mistake | Explanation |
|---|---|
| Not using a hose locking device properly | Failing to press down the hose locking device before inserting or pulling out the hose can lead to damage. |
| Insufficient electrical circuit | Using a standard 15-amp circuit instead of a 20-amp breaker can cause operational issues. |
| Not ensuring a dedicated circuit | Sharing the circuit with other high-power devices can lead to performance problems. |
Operating Steps
I use my large heat press for many types of production. I want high-quality heat transfers every time. I follow these steps to get the best results:
- I turn on the heat press machine and let it warm up to the right temperature.
- I select the material I want to print on, such as cotton, polyester, or ceramics.
- I set the temperature and time using the digital controls. For cotton clothing, I use 180°C for 15 seconds. For porcelain plates, I set 200°C for 180 seconds.
- I adjust the pressure for the material. I use the control panel to set the right amount.
- I place my item on the lower platen. I use the infrared positioning system to line up my design.
- I start the automatic pressing cycle. The machine uses air pressure to press down evenly.
- I wait for the timer to finish. The machine lifts up when the cycle ends.
- I remove my item and check the print. I repeat the process for high-volume production.
Here is a table that shows the best settings for different materials:
| Material | Temperature (°C) | Time (seconds) |
|---|---|---|
| Cotton clothing | 180 | 15 |
| Polyester clothing | 180-220 | 25 |
| Pearl plate | 180 | 120-180 |
| Metal pendant | 180 | 60 |
| Mouse pad | 180 | 15 |
| Porcelain plate | 200 | 180 |
Note: I always check the material instructions before I start printing. This helps me avoid mistakes and keeps my production smooth.
Safety Tips
Safety is very important when I use my heat press machine. I want to protect myself and keep my equipment working well. Here are the safety practices I follow:
- I keep my work area clean and make sure it has good ventilation.
- I use tools to move hot items and avoid burns or pinching injuries.
- I clean and maintain the machine after it cools down.
- I inspect the machine for wear or damage, especially the electrical parts and heating elements.
- I wear heat-resistant gloves and safety glasses.
- I keep a fire extinguisher nearby when I work with flammable materials.
- I talk with my coworkers to prevent accidents.
First of all, I make sure there are no kids or pets near my machine. The platens get very hot, sometimes up to 500°F. Even at 350°F, they can cause serious burns if touched.
Here is a list of steps I always follow for safety:
- I place the heat press on a stable, high-temperature resistant table.
- I set the temperature and time according to the material instructions.
- I wear professional high-temperature resistant gloves and non-slip closed shoes.
- I keep a safe distance from the heating area and use tools to adjust materials.
- I turn off and unplug the machine after use to prevent overheating.
| Consequence of Overlooking Safety | Description |
|---|---|
| Minor injuries | Cuts, bruises, or burns from hot surfaces or moving parts. |
| Serious injuries | Fractures, amputations, or even fatalities from mechanical failures. |
| Machine damage | Mechanical failures can cause downtime and affect significant production capacity. |
Tip: I always use the right heat press machine for my project. I choose the type that matches my workload and the materials I want to print.
I follow these steps and safety tips every time I use my heat press machine. This helps me get great results and keeps my production safe and efficient.
Applications and Advantages
Industrial and Craft Uses
When I use my large heat press machine, I notice it helps many businesses. Many industries need it to make lots of products fast. I use it to make custom clothes every day. But I also see these machines in other places. Some common uses are:
- Custom apparel shops
- Promotional product companies
- Sports uniform makers
- Corporate merchandising teams
- Small-batch fashion brands
- Fan merchandise creators
- High-volume sublimation print shops
- Sublimation blankets and bedding makers
- Polyester home décor and pillow cover businesses
- Soft signage and event display companies
- Wide-format garment production lines
- Team sports and athletic apparel shops
- Custom interior decoration product makers
I use my heat press to print on shirts and jackets. I also use it for home décor. The heat and pressure stay the same each time. This helps me get good results for every job. I trust this machine for both big and small projects.
Benefits for Different Projects
I think the KILO heat press machine gives me many good things. It works for both business and crafts at home. The digital control panel lets me set the heat and time easily. This helps me print well on every item. The heating element gets hot fast and keeps the heat steady. I do not have to wait long to start.
Here is a table that shows some features and how they help me:
| Feature | Description |
|---|---|
| Digital Control Panel | I set the exact temperature and time for each project. |
| Heating Element | The 8000W power heats up quickly and spreads heat evenly. |
| Adjustable Pressure System | I change the pressure for thick or thin materials. |
| Robust Construction | The strong frame lasts a long time, even with daily use. |
| Community Support | I join a Facebook group to get tips and help from other users. |
Other people say the machine works well with little setup. Many users like the strong build and sharp prints. I like that the machine saves me work and helps me finish more orders. The hands-free pressing and steady pressure are great for big jobs. I think this machine is good for anyone who wants easy and reliable printing.
Note: I always check my settings before I start a project. This helps me not make mistakes and keeps my printing smooth.
When I use my KILO heat press machine, I see it heats up fast. The heat stays the same on every project I do. The machine opens by itself and works quietly, so my room is calm. I use the two stations and digital controls for big jobs. I check the table below to see what makes this machine special:
| Unique Quality | Description |
|---|---|
| Quiet Operation | No beeping, keeps my space peaceful. |
| Fast Heating Time | Heats up in under 3 minutes. |
| Automatic Release | Opens by itself, so I never forget. |
| Safe Operation | Slide-out drawer lowers burn risk. |
Before I start a project, I think about these things: I set the right pressure for each material. I use both stations to get more done. I use the controls to set the heat just right.
I keep my machine in good shape by cleaning it safely and adding oil once a year. If you want a machine that is easy to use and gives steady heat, I think the KILO heat press is a good pick for your work or hobby.
FAQ
How do I clean my KILO heat press machine?
I unplug the machine and let it cool down. I use a soft cloth to wipe the platens. I avoid harsh chemicals. I check for dust around the controls. I clean the air inlet with a dry brush.
What materials can I use with my KILO heat press?
I use cotton, polyester, ceramics, metal, and mouse pads. I check the material instructions before printing. I set the right temperature and pressure for each item. I always test a sample first.
Why does my machine need an air compressor?
My KILO heat press uses air pressure to press designs. The air compressor helps the machine press evenly and automatically. I adjust the pressure for different jobs. This makes my work faster and easier.
How do I set the right temperature and time?
I use the digital control panel. I check the chart for each material. For cotton, I set 180°C for 15 seconds. For porcelain, I use 200°C for 180 seconds. I always test before starting a big job.
What safety steps should I follow?
I wear heat-resistant gloves and closed shoes. I keep my workspace clean. I use tools to move hot items. I unplug the machine after use. I keep kids and pets away from the heat press.